Building a Connected Cuckoo Clock

I’ve been building up my smart home setup for the last couple of years, and it generates a lot of data – from the cat’s weight, to the humidity in each room, and like any Smart Project full of sensors, the question becomes what do we do with all that data? Graphs and dashboards? Push notifications? Disembodied vocal announcements using the Sonos?

While cuckoo clock on a yellow wall. The clock has a ring of light around the dial and a red light shining onto the pendulum.

In the early 2000’s a company called Violet, released the Nabaztag – an internet connected Rabbit, with extremely expressive ears and lights on its belly. It wasn’t something I could afford at the time, but ever since, I’ve been interested in the idea of ambient or glanceable devices – devices that fit into our environment and let us know important information without directly calling for our attention.

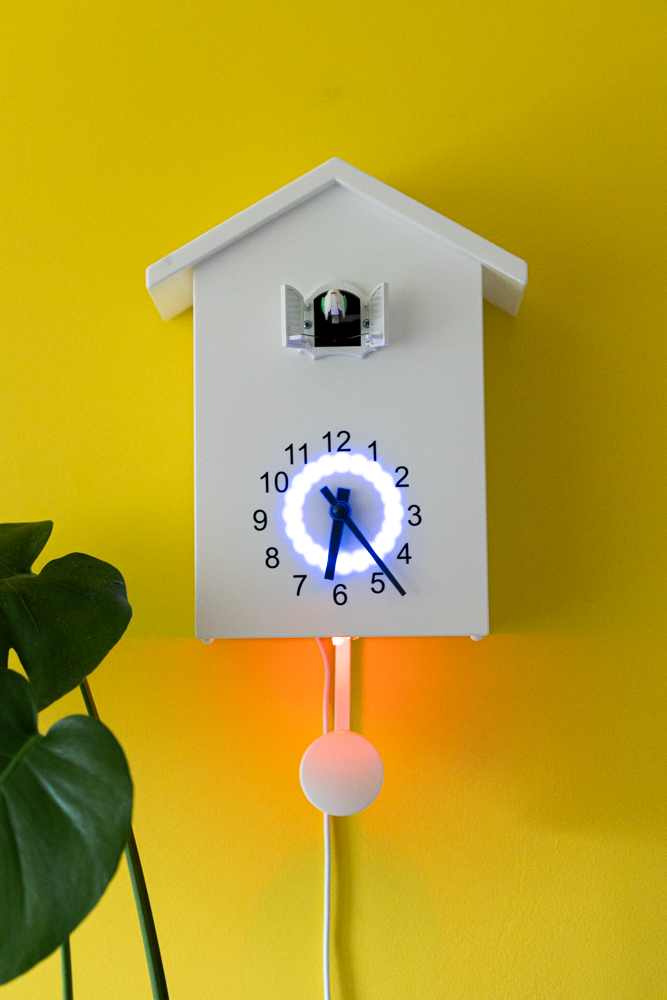
I decided to try to use a cuckoo clock as the foundation for an ambient device project.  I had this plan that I could add a light to the bottom of the clock that would create a nice glow on the wall behind it. I also planned to take control of the cuckoo mechanism, so rather than chiming on the hour, it could chime whenever I wanted (if I wanted a somewhat less passive notification). While putting together an order of the components I would need, I came across a ring of 20 RGB LEDS that would fit nicely behind the clockface, so I added that to the plan too.

Now, I have far too much respect for mechanical clocks to go tearing into beautifully made mechanical clock, so I started on eBay with a battery powered, plastic quartz clock. I was actually pretty impressed by this clock in its default state, it was reasonably attractive (if you’re into modern minimalist cuckoo clock styles) and the cuckoo sound was decent. My only real complaint was that the hands were a really long way forward of the clock face, which didn’t look so great if you weren’t looking at the clock directly from the front.

The Teardown

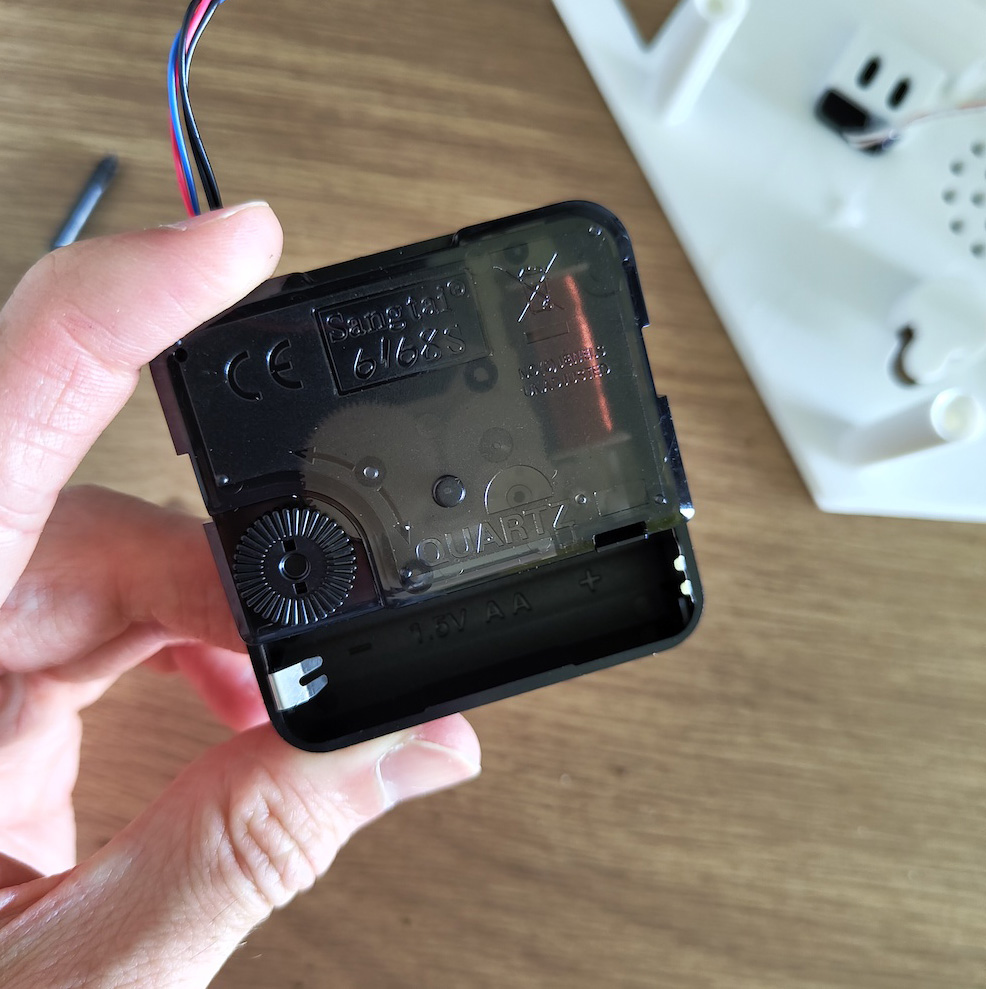
I started pulling the clock apart to see what I would find, and it was pretty interesting. The chime & cuckoo are in their own module, connected to a clock & pendulum module. I was amused to find that when I further dismantled that clock module, it contained a standard clock unit inside it – complete with normally inaccessible AAA battery connecter. Because sometimes, even in mass production, its easier to repurpose an existing item then built it from scratch.

The quartz clock module, showing the AAA battery connector

Continue reading

State of the (IoT) Union 2022: Smart Home Year in Review

Hello again! It’s almost the end of the year, and I think it’s a good moment once again to run through the various smart home things I shared and how they’ve panned out after the post were published.

A pot noodle surrounded by tools including a soldering iron, wire cutters and a multi meater.

Bathroom Fan

Last year, I shared how had used a Shelly Relay, Home assistant and some humidity sensors to add some smarts to my bathroom fan. Since then, the system has been running un-modified and I am very impressed with its reliability. The only issue I’ve encountered is that as the fan switches on, sometimes the relay will reboot, and the fan would stop again. It was very irritating. This is caused because the fan cam sometimes causes electromagnetic interference as it starts and can be fixed with the installation of an RC snubber.

Smart Heating

One of the first things I wrote about here was how I built a smart heating system without damaging my property. Last year I mentioned that I was going to upgrade the system to also use Shelly relays.

I did, indeed, complete this project but didn’t really write about it. I’m really pleased with this upgrade, as it allows me to switch on an off individual heaters, rather than the entire properly at once. I created some somewhat elaborate Home Assistant automations to switch on only the rooms I need when I am working from home. Hopefully this should help me save some energy.

Cat Litter

In June, I wrote about my connected cat litter project, which I could use to track my cat’s health over time by automatically weighing her whenever she uses it. While getting it working at first was a little bit of a struggle – requiring me to film the litter tray to figure out how Ellie was using it that was causing issue – this has been incredibly reliable and a great success. I’m very happy with it.

A notification reading Ellie (3.65Kg) has left you a present in the litter box (20g)

Unfortunately, Ellie was a little ill early this year and lost a lost some weight. I’m pleased to say that she has made a full recovery now, and the smart litter was fantastic for tracking her recovery as she gained back a healthy weight.

Misc Smart Stuff

  • Automatic Blind – While renovating my bedroom, I added a very basic blackout blind, to stop the morning some from shining around the curtains and waking me up. In an Amazon sale I picked up an automated blind opener. I integrated this into Home Assistant, and I was really happy during the summer heatwave, that I could leave both the window and curtains open, for the best cooling, but have the blind shut itself just before sunrise.

  • The lights in both my bathroom and kitchen are both Ikea Tradfri GU10 spotlights. Initially I was pretty impressed with these as a cost effective solution to adding smart lights to rooms that require a lot of individual bulbs. However, during use, they’ve proven to be really fickle. I have one set connected to my Hue Bridge, and the other to a Zigbee card connected to my Home Assistant Pi. Both sets of lights exhibit odd behaviour where they will turn on really dull and then 30 seconds or so later, go to full brightness. This stopped for a while during summer, while they worked perfectly, but came back again – given they are installed in the roof space, I wonder if this is temperature related somehow?

  • Living in an older property, keeping an eye out for damp in cold weather is a way of life, I recently added a dehumidifier to keep a handle on the indoor humidity when cooking. To keep running costs down, I made use of the humidity & temperature sensors in each room to detect when it needs to be turned on and when it can be turned off again.

Looking Forward

I’ve got a few projects planned for 2023, some big and some small, but I’m going to keep them as a surprise for you. I also want to take a look at energy monitoring, possibly making use of the Home Assistant Glow project.

I hope you have a happy new year, and I’ll see you in 2023!

Git For Humans: A Easy To Understand Video for Working With Git

A few years ago, I was working on a team who had been working with TFS project for some time. They had just started a new project and decided to move to Git in the process. Git was new to all of the engineers on the team, myself included, but we continued anyway.

At first, everything seemed to work fine – Visual Studio’s built in Git UI did a good job of hiding Git’s power, and presenting it in the same way as TFS. However, we increasingly ran into problems; people lost work, or waisted time working though merge issues. Visual Studio was doing a fantastic job of hiding Git, and while this seems like a well-meaning and helpful thing to do, it was causing us issues in the long run, because we were didn’t know what we were really doing behind the simple UI.

I decided to go away and deep dive into Git. I found that by understanding the Git graph, it allowed me to demystify the Git’s command line and visualise & plan their impact on my repository.

I started sharing what I had learned with my team, and was frequently asked to run training sessions or solve problems. I really did find that by understanding how Git works, and visualize the operations, I was able to work much faster and with much greater confidence.

I’d love for everybody to see and understand Git in this way; it really is a wonderful tool once you’ve unlocked it. So, I decided to put together a video to share how I see Git.

You can watch it above. This was a fascinating learning experience for me; setting up the recording and learning how to efficiently edit large projects (shout out to my video editor friend who’s brains I picked several times!). Constructive feedback is, of corse, gratefully received.

As ever, you can get in contact by commenting or on Twitter / Mastodon

Internet of Poop: How (and Why) I Built a Smart Litter Tray

Naturally, we want our pets to be as healthy and happy as possible, and just as with humans, one valuable metric to know is their weight. Knowing the weight of our four-legged friends, not only helps us to verify that they have a healthy amount of body fat, but can also can be used to detect things early on that may need medical attention. As they cannot speak to us and tell us when don’t feel well, it is our duty to listen to all of the different signals we have to understand their wellbeing.

Photo of a black shorthair cat sitting.

That’s why I wanted to know the weight of my cat, Ellie. Unfortunately, she really dislikes being picked up or handled, even by people she trusts. This means, it’s not possible to weigh her on a bathroom scale, and the only datapoint I have is her yearly examination at the vets. 

I wanted to build something that would fit into her life to track her weight automatically, without any intervention. I decided to modify her litter box, so that on each visit it records her weight.

But WHY, Andy?

Okay I get it; you think it’s weird. So here are the main goals of the project: 

  • Track Ellie’s weight because I want to know how heavy she is without going to the vet
  • Learn something about how load cells work
  • Have fun building a new project
  • (Hopefully) Inspire others to try out new ideas and projects by sharing what I learned. 
  • Track the weight of poops because I thought that was funny. 

The Hardware

Rather than build the whole litter tray from scratch, I decided to build a platform that her existing litter tray would rest on. This platform would contain all the equipment necessary to detect when Ellie was using the litter and start taking measurements.

Continue reading

How To Make a Long Term Career Plan That Actually Helps

A career plan: we should all have one, right? But it can be hard to know where to start, or what you should do with it once you’ve made it. This can be especially challenging when you’re just starting off in your career – you manager asks what you want from your job, and don’t really know what you want beyond ‘just progression’.

A child stand in the countryside, holding up a map.
Photo By Annie Spratt

Today, I want to tell you a little about how I manage long term career planning for myself, and how I use that to make regular evaluations of those plans and my progress towards them.

A Plan Is a Guide to The Next Step, Not a Rigid Set of Rules

It’s easy to think of a career plan as something rigid and unchanging; a plan that you must stew over and perfect every detail, and then stick to forever. This can make a career plan a very intimidating document. How do you think it all through? How do you know if you’re on track or not? What if you’ve made the wrong plan and won’t be happy!?

Instead, think of a career plan as a framework to help you process your feelings and observations in order to plan out next steps. You can then regularly use this framework to evaluate your current path and chosen destination.

Imagine, you’ve been dropped in the wilderness without knowing where you are or how to get back. Perhaps you climb to the top of a large tree nearby and look out around you. As you look to the north, you can see smoke rising in the distance, maybe it’s a camp? You decide to head towards it and find out.

A person standing in the clearing of a forrest.
Photo by Robert Bye

After walking for a couple of hours, your progress is halted by a wide, rushing river, and there’s no way you can cross it. There’s no way to continue to the north now. It’s time to revaluate your plan, heading north was a great idea in absence of more information, but now you know about the river, is heading that way, still the best path? Perhaps you can see something else from here? Perhaps north is still the best direction, but you need head a different way for a little to find a place to safely cross and head back.

That’s the thing with plans: You need them, they give you direction of purpose, but the most successful people are always considering their plans – changing and tweaking them to ensure they’re making the best choices for the current data they have. Changing a plan is not a failure, it doesn’t mean your plan wasn’t good enough. Changing plan means you are in control and evaluating input data.

Where Do You Start?

Just like with the above example, you start not with the next step right in front of you, but with the destination, and figure out next steps from there.

Continue reading

State of the (IoT) Union 2021

Following on from last year’s IoT roundup, I thought I’d take another moment to reflect back on the current state of my smart home; how some of the previous projects have aged since first writeup, what’s new and what I’m looking to tackle next.

And oh my gosh, what a year 2021 has been! New homes, new jobs, even more working from home! Let’s get stuck in…

TikTok

As I built more and more smart things, I decided it might be fun to share what I learned on TikTok. I started the AndysSmartHome channel, and so far I’m really pleased with how its going.

Home Assistant

In last year’s round up, I mentioned that I was starting to play around with Home Assistant, this year it’s the centrepiece of the whole SmartHome setup. I am super super pleased with it. Getting it to work as I want is sometimes more a challenge than I would like – its certainly not something I would recommend to a non-technical person – but i’ve really been able to achieve a lot with it and I’ve not scratched the surface.

Bathroom Fan

Continue reading

How I Hacked My Coffee Machine To Be Smart

Before the pandemic, when we started working from home, I used to make coffee a number of different ways, depending how I felt. I liked to experiment – sometimes I would use a V60, others a French Press, coffee syphon or espresso machine. This worked well on the weekends when I had time to experiment a little. However, when you need to grab a quick coffee between meetings, it turned into a real faff; there’s just no matching the convenience (if not the quality) of the office coffee machine.

My solution here was to pick up a Morphy Richards Verve filter coffee maker that I could leave running while I went about my work and come back to when it was done. I was really surprised with this machine, I was expecting to sacrifice a lot of quality for convenience, but with a little fine tuning on ground size and water quantity, its capable of producing some very drinkable coffee.  

Occasionally, though, I would get it brewing and forget to go back to collect the drink, leaving it going stale on the hot plate so I decided to see if I could connect it to my network for notifications and control.

My requirements were:

Continue reading

Adding RGB Light Strips To The Kitchen

Photo of the kitchen showing the installed lights

My kitchen has some pretty bright spotlights in it, but they’re only in use when you’re working in there – once you turn them off and leave, the room can be very dark and its kind of depressing when you walk past it. I wanted to add some warmth by putting some soft under cabinet lighting. 

I started in the Amazon end of summer sale by picking up the cheapest RGB strip lights on offer. I was a little worried that some of the reviews mentioned that the power pack was a a bit suspect and had exploded for a few people, so I decided to use an old generic laptop adapter I had lying around. I measured the power draw of the full 10m of lights to make sure it was powerful enough for the job.

The lights I bought came with an IR remote to control the brightness and colour, but I wanted to be able to control them though Home Assistant. I connected them up to a Shelly RGBW2 controller.

Because of the layout of the cupboards, I needed to fit the lights in several strips, so I bought some strip connectors from eBay, as well as an RGB strip extension cable, that I used to connect the sections together in series.  

Continue reading

B&W Cross Processing Kodak ColorPlus 200 While Pushing to 400

A couple of months ago, I put a film in my Pentex ME Super, took some photos and then got distracted for a little while. In that time, the box end on the camera back slipped out and I totally forgot what was in it.

When I returned to shooting, I assumed that the film must be Ilford HP5 plus – what I normally use – and went out to take some photos. Unfortunately, on rewinding the film, I realised that I’d made a mistake – the Film was not HP5, but Kodak ColorPlus 200.

This was disappointing because I was partially looking forward to seeing some of the photos I had taken in black and white. I guess I could have the film lab developed in colour and convert to B&W in Photoshop, but that feels wrong somehow.

That’s when I discovered, that not only had I been using colour film thinking it was B&W, but I had the camera set to ASA 400, when this was a 200 film, so now I have an entire underexposed colour film that I wish was black and white.

I contacted a couple of labs to ask if they could push process a C-41 film with no luck, I considered just having it developed at box speed and trying to fix in photoshop. I decided, though, to use this as an experiment and learn something from it (other than to pay attention to what you’re shooting with). I’d heard that you can cross process C-41 film in black and white chemistry, but searching seemed to indicate about as many people saying it hadn’t worked as had.

Then I came across this post, where the author used both the same film stock and developer as I had. In the post he had used the average development times for black and white film. I decided to do the same, developing at low temperature and doubling my normal development times from 6:20 to 12:40.

I also wanted to push process this film to compensate for my incorrect camera config, to do this I combined the “double it” approach from above, with a rule of thumb I remember reading once of “one minute per stop”, and added two minutes for a total development time of 14:40 minuets.

Continue reading

Detailed VW Golf 8 Review: Have You Tried Turning it Off and On Again?

Nine months ago, I upgraded my car to a new Volkswagen Golf 8, and I thought it was time to put together some of my thoughts so far.

I bought the car myself, with my own money, after an extensive search of multiple manufactures. VW had no editorial input into this review, nor have they seen it before publication.

Photo of the drivers side dashboard.
Does this dash remind anybody else of KITT?

Car Spec

My specific car is a Golf 8 Style with the 150HP Petrol TSI engine and manual gearbox. It is in Atlantic Blue with the following factory fitted extras:

  • Winter Pack – Heated front seats, heated steering wheel and three zone climate control.
  • Reverse Parking Camera – Camera Hidden in the rear VW logo shows you the area behind your car when reversing.
  • Park Assist – Allows it to automatically parallel park or reverse into perpendicular parking spaces.
  • Dynamic Chassis Control – Allows the car’s handling to be controlled by the driver’s selection.
  • Variable steering – Changes the steering ratio based on speed and driving profile.
  • Spare wheel – Adds a space saving spare wheel in place of a puncture repair kit.
  • Keyless entry – Allows the doors and boot to be unlocked with the key in your pocket, by lightly touching the door handle.
  • Mobile key – Allows a phone to be used in place of the car key (currently supports a small number of phones)
Photo of the gear shifter.

Purchase Experience

I bought my car in person (between lockdowns) at a local VW agent. While much of my experience will be specific to the agent rather than the Golf or VW, they are the franchise of choice for VW and form an important part of the end customer experience.

I found the experience to be a bit of a mixed bag; On entry, not knowing what I was looking for, I was very impressed with the no-pressure way that the agent showed me the range, listening to my thoughts, and helping me understand the differences.

Continue reading